Sunday, 22 February 2015

Vintage Stitching

Hello all,

Well another week has passed and unfortunately I've done absolutely no crafting this week.  It was my son's 18th birthday on Friday so I have been shopping and organising for that and of course tidying the house for visitors coming! Lol!

However, this afternoon,  enthused by this week's vintage sewing theme on The Great British Sewing Bee TV programme,  I decided to take my vintage Singer out of the box and see if I could get it to work. (I purchased it a few months ago at auction).


The machine is actually in "nearly new" condition, with no rusty bits or gunky old fibres clogging the mechanics.  I simply gave it a good oil and dust, threaded it up and off it trundled.  I didn't even have to adjust the tension, it sews perfectly and it can go at a fair speed.  


these are the reverse side/bobbin stitches

I've a busy week next week too but hopefully I'll be able to post something!  I'm trying to maintain a weekly post and joining in with Handmade Monday certainly helps. It's a lovely little community of very friendly crafters but the link up is only open for a couple of days so you'll have to be quick if you want to join in.

Okay that's me for today, thanks so much for visiting.

Wishing you all a good week.

Take care

Suze xx

Sunday, 15 February 2015

I hate zips!

Evening all,

To all the sewers out there, can I just ask, does anyone like sewing zips!? I must have read and watched every tutorial out there and I'm still struggling.

Anyway, I wanted to have a go at sewing a boxy zippered pouch. I found a YouTube video by Debbie Shore for one that's made using two fat quarters and it's easily big enough to hold knitting needles and wool, so I thought I'd have a go as she explains things very clearly.

The best tip I learned from her was to use a longer zip than you need (and trim it to size after sewing), that way you can slide the bulky zipper pull out of the way.  However, I still had a problem with the fabric & zip sliding about and I had to partly unpick it about 4 times.

However, I persevered and here is the end result which I am actually quite pleased with ...


I have to admit the knitting is not mine, I borrowed it for "photographic" purposes, lol.  My mother is a great knitter and this is one of many baby hats she's currently knitting for African babies.

Linking to Handmade Monday.


and wishing you all a creative week,

Thanks for popping in

Suze xx

Sunday, 8 February 2015

Tote Bags

Evening All!

Hope you have all had a good week.  I've been quite productive in the sewing department these last couple of days.  I've never sewn a bag before and when I saw a kit for one selling online at half price I couldn't resist.

It's just a small tote bag and it turns out they are SO easy to make, however the instructions weren't entirely correct so you would need a bit of  an idea on construction to make it work first time.  You don't need a kit though as there are loads of free tutorials online.

This is the finished bag from the kit ...


I thought it was such a cute bag, perfect for a little girl, that I went and bought some more fabric and I have to say I like this fabric even better ...


They're made with upholstery weight cotton so they're quite sturdy.

I'm linking again to Handmade Monday.

Okay, that's me for today, thanks for taking the time to visit.

Suze xx

Sunday, 1 February 2015

Friendship Cushion

Hi all,

Well, that's January out the way, the days are thankfully beginning to get a bit longer although it's still absolutely freezing!

I have some sewing to show you today, It's my big "50" birthday later this year and so a fair few of my friends are also turning 50.

The first one to celebrate is my life long friend, we were neighbours growing up and have had many laughs throughout the years.

I've made her a double sided cushion, one side to go with her decor and the other using photos of ourselves and other close friends.

The photos were printed onto printable cotton.  I then ironed them onto some Steam-a-Seam/Bondaweb, cut them out and stitched them onto some plain cream fabric. I also made up a word cloud image using www.tagxedo.com and also printed that onto cotton.


the photos


front of cushion


back of cushion


I then constructed the cushion front and back and closed with a zipper.

I'd like to link to Handmade Harbour, which is now hosted by the lovely Vicky

and Anything but a Card, who have the theme Friendship.

Okay, that's me for today, thanks so much for popping in.

Happy Crafting!

Suze xx

Sunday, 11 January 2015

Cushions and an old Singer!

Hi everyone and welcome to my first post of the year (and my first post in over a month!).  I felt like I needed a bit of a break over the festive season but I've given myself a kick up the bahookie to get me back into blogging and crafting.

As I previously mentioned, I want to concentrate more on building my sewing skills this year, so I've made a start with some zipped cushions.

I've only made cushions once before and that was with an easy envelope fold closure, but I thought I'd challenge myself to inserting a zip for a more professional finish.

The fabric is a linen/cotton mix called Hedgerow and is by Voyage, they're a Scottish firm and make some lovely home decor fabrics.  The backing fabric is 100% linen which I have to say was a bit stretchy! I used 20" feather inserts so they're nice and puffy!


I'd also like to show you my vintage sewing machine which I picked up at a local auction for £24! It came totally complete with instruction booklet, feet, knee lift, needles etc.  I've done a bit of research and it was manufactured around 1939.  My son replaced the old round headed plug for me and it works!  It's a bit stiff though so will need a thorough clean and oil.  Have to say though, I've nowhere to put it, I just bought it 'cause I liked it!


Okay, that's me for today, thanks ever so much for popping in.

Linking to Handmade Monday.


Suze xx

Monday, 8 December 2014

Christmas Gift Card Holder

Hi all,

Time again for another challenge over at Crafty Cardmakers and More, our theme being CHRISTMAS! Nice and easy as I'm sure most folk have been busy doing some sort of Christmas crafting.

This is my final DT post for Crafty Cardmakers as I am stepping down after a most enjoyable 2 years. My decision has come mainly from the fact that I do very little cardmaking now, I'm going through a "sewing" phase and I'm also volunteering at the local family history centre to help transcribe the 1911 census, so it's just a case of the usual "not enough hours in the day"!

I'm not totally disappearing though, I'll still be loitering in blogland visiting you fellow crafters.

Anyways, I have made a selection of Christmas Gift Card Holders.  It's a nice quick simple design which makes two holders from one A4 sheet.


All the fronts were covered with some Christmas DP and most have a simple Merry Christmas sentiment, embossed in silver and mounted onto miri card.  I also used a Tim Holtz santa stamp and a Hero Arts snowman stamp.

To make two holders from one A4 sheet, cut at 11 cm and 22 cm on the long side of the sheet.  This gives you two strips measuring 21 cm x 11 cm.

Score at 8.5 cm and 17 cm.  The second score forms the pocket.

I then just added a circle of white card for writing on.


If you have an envelope board maker, a 6 3/4" square, scored at 3", makes the correct sized envelope.

Our sponsors for this challenge are SIR STAMPALOT


and also DT member Kim has donated a fabulous crafty bundle of goodies.

Well that's it from me for today, I hope you are all further advanced in your Christmas preparations than I am.  I've only just started shopping and also this weekend decided to redecorate my living room.  A nice quick freshen up I thought, but as always it turns about to be a bigger job than expected. Couldn't get the blooming wallpaper off the wall, thankfully it's only on one wall.  I'm also intending making some cushion covers to fit my new colour scheme so I'll definitely be burning the midnight oil between now and the 24th. Lol!

P.S. I've just noticed that google verification has randomly appeared in my comment box.  I do not have verification switched on! I've just tested it and you can still leave a comment without filling in the verification box, so just ignore it!

Okay, thanks for popping in,
Bye for now

Suze xx

Tuesday, 25 November 2014

Christmas Tag Thingy

Hi all,

I'm a bit latchy with this post, can't seem to get out of the bit at the moment. 

Yesterday saw a new challenge launched over at Crafty Cardmakers and More.  Lin is our hostess and she has chosen the theme DISTRESS IT.

Now I have to say, I'm not really a distressed type of girl, I like clean, simple lines! Lol! However, I do have some Tim Holtz stuff and to me he is the King of Distress!


I cut a circle from corrugated card and tore off some of the top layer (this is a technique favoured by my lovely blogging friend Valerie).  I painted the card with some off white paint from one of the many paint testers I have lying around the house. (I am determined to get my living room freshened up before Christmas!)
The "25" and reindeer are Tim Holtz dies, painted with red stickles and glossy crackle accents respectively.  The star was cut from gold miri, distressed with sandpaper.  I added some more painted card for the snowy hills, topped with stickles and the wire berries and sequin ribbon were from my stash.

our sponsors for this challenge are


Okay, that's me for today.

Thanks a lot for popping in.

PS. I've just noticed that google verification has randomly appeared in my comment box.  I do not have verification switched on and I've just tested it - you can still leave a comment without filling in the verification box, so just ignore it!

Take care
Suze xx

Monday, 10 November 2014

Charming

Hi all,

Well another week closer to Christmas and time for a new challenge over at Crafty Cardmakers and More.

Josephine is our hostess and she has chosen the theme "A Touch of Charm"  - she would like to see a charm added to your project.

I do like a tag on a card, so here's one! ...


I used a mannequin stamp from Kaisercraft, inked with Vintage Sepia. The flower is cut from cream felt using the Tim Holtz pinecone die and the charm is from my stash, tied with some gold twine.

I'd also like to join in at Addicted to CAS, whose Code Word is TAG

and CAS on Sunday, whose theme is Use Ribbon and/or Twine


Okay that's me for today, I seem to have a busy week this week.

Thanks for popping in.

Take care
Suze xx


Monday, 27 October 2014

Cut it Out for Crafty Cardmakers

Hi all,

Gee whiz, two posts in two days, it's not like me!

Anyways, time for another new challenge over at Crafty Cardmakers and More.  Leslie is our hostess this fortnight and she has chosen the theme CUT IT OUT (you must use die cutting or punches on your project).

Here's my card ...


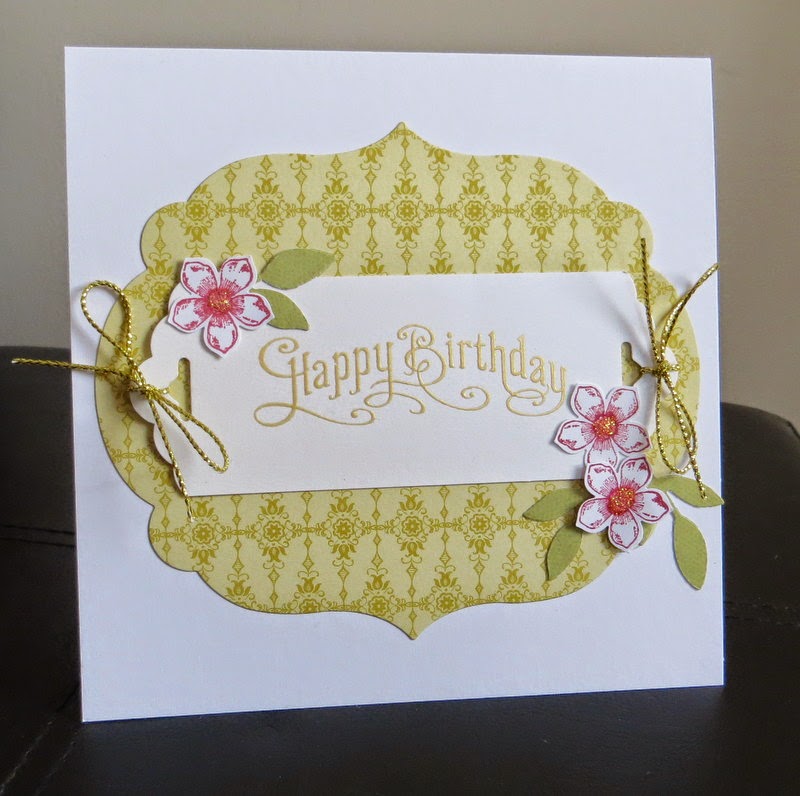
I used Stampin' Up DP which I cut with an SU framelit. Flowers are SU matching stamp and punch with a touch of Stickles in the centre. Sentiment is also SU, gold embossed and I also used an SU tag punch and some thin gold cord.


Our sponsors for this challenge are 


and


Hope you can find the time to join in our challenge.

Thanks for popping in.
Ta ra,

Suze xx

Sunday, 26 October 2014

A Stitched Card

Hi all,

Well the clocks went back last night so our days are now very short, tonight it was dark at 5 pm! It's very tempting to just laze in front of the TV on the dark winter nights so I'll need to try and motivate myself to put my specs and the bright light on and do some sofa crafting as I've still some bits and pieces to do for the upcoming Christmas fairs.

The card I have for you today is inspired by the very talented Josie from SewforSoul who makes free machine stitching look super easy.  Well, I'm telling you it's not as easy as it looks. Please do not zoom in on the photo as the sewing is all over the place. (Maybe I could get away with saying it adds to the rustic charm of the card, Lol!)

I used a digital image I won a while back from Handmade Harbour .....


I traced all the elements of the bird onto iron on adhesive (Bond-a-web/Steam-a-Seam etc), then cut them out and ironed them onto scraps of batik.  All the pieces were then ironed onto a plain background which I then free machined (kinda like drawing with your sewing machine). I then placed my sewn pic behind a dotty frame made with Stampin Up DP.

I'd like to link to Handmade Monday which I haven't joined in with for a few weeks


and
Lets Craft and Create - Challenge #98 - Animal Antics

Okay doke that's me, I'll be back tomorrow for a new Crafty Cardmakers challenge.

Thanks for popping in.
Take care.

Suze xx

Monday, 13 October 2014

Focus on the Sentiment

Hi all,

I'm dropping in with a quick card for the new challenge over at Crafty Cardmakers and More.  Our hostess is Lin and the theme is IT'S ONLY WORDS. (The sentiment should be the main focus of your creation).


I used a lovely sentiment from Hero Arts, which I gold embossed.  The two little birdies are a Memory Box die, cut from gold miri and the papers are from my stash.

I'm still beavering away on the sewing machine making stock for my upcoming Christmas fairs, I really must get some of it posted to show you what I've been up to.

Anyways, must go and unpack the supermarket shopping. Honestly, the daily domestic chores don't half get in the way of crafting!

Thanks for popping in.

Take care
Suze xx

Monday, 29 September 2014

Blue Bunting Birthday Card

Hi all,

Gee whiz,  it's been ages since I've posted. I am a very bad blogger! I haven't been totally idle though, I've started thinking about making stock for my Christmas Fairs.  All my Christmassy stash has been taken out of the cupboard and some of the non Christmassy stuff has been stuffed back in it's place! I daren't open those cupboard doors now for fear of an avalanche!

Anyway, I'm here with a card for the new challenge over at Crafty Cardmakers and More.  One of our new DT members, Pamellia, has chosen the theme THE TRIPLE B CHALLENGE.  She would like you to include 3 of the following on your creation:
Butterflies
Blue
Birthday
Banners
Buttons

I've chosen Blue, Birthday and Banners as it just so happened I was sewing some blue bunting last weekend, so I used some of the left over scraps on my card ...


I used: Blue fabric scraps, a Stampin Up sentiment, blue card stock, oval dies and an SU framelit.

When stitching onto card use an old needle and a longer stitch length, so that you don't get too many holes in your card and go slowly!

And here is the said bunting, though it's not finished because I didn't buy enough bias binding and when I went back to get more, they didn't have any more! So I had to go to another shop this morning where luckily they did have the colour I was after and also some Christmas fabric just happened to jump into my basket, so expect some Christmas bunting and stockings to follow! 


Also linking to Handmade Monday


Have a lovely week.

Take care

Suze xx


Tuesday, 9 September 2014

MWAH for Mrs P

Hi all,

A quickie post today to send get well wishes to a lovely (did I really use that adjective to describe her!) fellow blogger, Marie (Mrs P) who is having a tough time, not only with a gammy leg, but lots more besides!

The lovely Kylie over at the Addicted to Stamps Challenge has added the option of making a get well card, to the current challenge, to try and cheer the old bag up!

Well, I couldn't not join in, or I would never hear the end of it (would I Mrs P!)


The lips stamp is from Stampin Up, using real red ink and clear embossed.  Sentiment is PC generated.

Get well soon Mrs P!

Mwah!

Suze xx

Sunday, 7 September 2014

Kaffe Fassett Workshop

Hi all,

Well, last Sunday I was at my Kaffe Fassett workshop and what a great day it was.  Not just because Kaffe (and Brandon Mably were there) but just because I spent a whole day doing something I enjoyed with like minded people.

We were designing a "snowball" quilt, which is basically just squares with small contrasting corner squares, which gives the illusion of a round shape, hence "snowball".

These are the fabrics I had purchased beforehand and I cut them all into 6" squares, to save time at the workshop


Well of course, they weren't all suitable so I had to purchase more fabrics when I was there! Honestly, I have enough left over squares to make about 10 cushions (which I think is what I will probably do, rather than make another quilt).

Here is my quilt before the "corner stone" squares were added 


and this is it with the corners added.  The photo doesn't give a true colour, the small squares are quite a vivid red batik


At the end of the day, the man himself critiqued everyone's quilt.  He was very complimentary of everyone's work.  He loved the rich blues and purples of mine, and the red added a dramatic touch ... like "Cruella de Ville's nails" Lol!!


Needless to say, I haven't even started sewing it together!

Linking to Handmade Monday


Have a great week everyone.

Take care

Suze xx

Monday, 1 September 2014

Embossed Hearts

Hi all,

A very quick post to tell you about the new challenge over at Crafty Cardmakers and More.  The theme this fortnight is "DRY EMBOSSING".

As per my usual style, I have made a clean and simple card, suitable for a wedding or anniversary ....


Supplies Used:
Hearts cut with Sizzix Primitive Hearts Die
Embossing folders - Swiss Dots and Victorian Fleur
The bows and 'love' dies are from Memory Box
Coloured card and ribbon are Stampin' Up Raspberry Ripple

Thanks for popping in, hope you can find the time to join in our challenge.

I'll be back soon to tell you all about my Kaffe Fassett workshop.

Suze xx

Sunday, 24 August 2014

Fabric Tissue Holder

Can you see my halo glowing! I spent all day yesterday tidying out my craft room.  I didn't actually throw much out (!) but I did a fair bit of re-organising,  took all my craft fair stuff out of the big cupboard in preparation for Christmas and have all my sewing fabric and "accoutrements" at hand!  I even have a space on my desk for my sewing machine - although it's still meantime set up on the kitchen table as that's much bigger and handier for cutting etc etc .... :)

I now only need hubby to put me up a couple of "big" shelves so I've got a place for crafty books and can get all the other "non essential" stuff off my desk!

Okay, now onto the crafting bit.  I needed to make some quick raffle prizes for my sewing group, so browsing the internet I came across this tutorial for a fabric tissue holder by Fiona at Two Brown Birds.  This really is a very easy make (suitable for a beginner if any one fancies giving it a try!).


I'd like to link to Handmade Monday.


Okay dokes, that's me for now.  I probably won't "see" you again until next weekend when I have my Kaffe Fassett workshop! So looking forward to it.

Wishing you all a lovely week.  Thanks for popping in.

Suze xx


Sunday, 10 August 2014

The Quilt is Finished!

Hi all,

I'm dropping in today to show you my finished quilt.  I've really enjoyed making it and it's been such a learning curve.  A lesson in sewing seams, unpicking seams then sewing them back together again so they join together neatly!


I pieced left over fabric to make the back ...


I think my favourite bit is the stripey binding, it just ties it all together ...


I decided to quilt it in straight(ish) lines which I think compliments the design of the quilt and besides, I wasn't confident enough to try free machine quilting a fancy design!


I've really got the sewing bug now, card making has temporarily gone out the window!

Linking to Handmade Monday


Thanks for popping in, wishing you all a lovely week.

Suze xx